Friday, March 16, 2012

Party update

Who would've guessed that my destructive mini monster is turning one so soon!!! 6 more days until her birthday and 8 more days until her party!!! I'm sooooo excited. I have so much to do and yet I feel like I can't get anything done.


Clean? Whats the point with 7 people living in my house?? Cleaning shall commence on Thursday. As will doing my hair and nails. 


Bake?? Nope, my fridge is old and I don't trust my cake pops and Oreo truffles and Oreo pops to NOT taste like fridge, so that I shall start on Wednesday. Cupcakes, out of the question, that is the morning of.


Ok, so then I have to do the tedious work of finishing all the decorations which I decided to make. Its a great way to pass the time and are so much cheaper than buying. So here is what I have done so far:


 I showed you this before..... homemade happy birthday signs. 


Home-made pinata.... still have to finish it


These are the empty plastic containers that I covered with tissue paper and tissue paper polka dots... thus FREE containers to hold utensils and or cake/marshmallow pops


These are the poms I am going to use to decorate the living room


This is my beloved cake/ cupcake stand. Yes its upside down, the glue was still drying. A cupcake stand alone will cost you somewhere around $25. A cake cupcake combo will cost $30 or more. Here is mine.
3 plastic serving plate: .99 each... $3.00
2 glass candle holders, I couldn't find any so i used thin glass vases: $2.00
2 Cans of spray paint $7.00

Total cost: $12. And you get to customize your own colors.


These are tissue paper garland... practically free. I used one sheet of each color tissue paper, folded it over and over and cut out circles. Used my sowing machine to sow them together... um you may have to buy extra thread?? What $2??


That's all for now folks. 


Oh and a shout out to my friend Malcolm.... he said that since I am now a stay at home mom I should start my own baking blog... ditto...lol.... you ever need me to bake Malcolm, for a party, as a treat to bring to someone, or just cause... you know who to hit up :-D

Friday, February 24, 2012

Ive gone B-A-N-A-N-A-S for Kayla's Party

So about a month ago I finally started looking at things I might want to do for Kayla's 1st birthday party. That's when I finally got into Etsy. I spent so much time on there that I had to make myself stop and didn't allow myself to do Elmo-themed birthday browsing until a month before her birthday. Mind you I said that thinking I would only last a few days. Then Monday I'm browsing the computer and I look at the bottom right corner of my laptop screen and I'm like, " Oh S#*T!!! its the 20th!!!" . 


Where in the world did the time go. Its funny because at first Tony was the one who was more excited about the party than I was. But then the event planner in me saw this inspiration from Hostess with the Mostess. 
Elmo Birthday Party


That's when it dawned on me that I could do an Elmo themed party without Elmo everywhere and those primary colors that I find so annoying. And I'm off.... spending hours on Etsy and Pinterest trolling for inspiration and finding ways to Google search D.I.Y. whatever I find. I'm doing mainly red, pink, and white with yellow and orange accents


Here is what I have so far.... im torn between these two invitations. I made them on publisher.


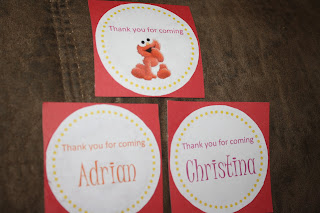
And here are the personalized favor tags


And to fill these favor bags I have these coloring books I made

I bought a 24 pack of 4-crayon cases at Party City to go with these along with some random toys. I want to make chocolate covered Oreos to put in them as well, like these 

Ok next I got these mini-bubbles for which I made some custom labels for

For decorations I'm using these tissue pom poms, they are really simple, I just need to get floral wire, here is one I did for practice
And my pies-de-resistance my happy birthday banner... I LOVE the way this is turning out, I feel so cool, lol. 


AND then I ran of color ink so I'm off to Office Max tomorrow for ink so I can finish the banner. I'm going use the extra scrapbook paper to make cupcake toppers attached to toothpicks. 
The place where we are going to have her party is big, and the ceilings are really tall so Im not going to go crazy decorating the whole place. Im going to focus on two tables, one for all the cake and desserts and the other Im going to have cups, plates, the goody bags, and the bubbles or something like that. Here are some inspirations for my dessert table.
cake pops
Oreo Truffles
cake pops covered in sprinkles
Cake Pops

marshmallow <3
Marshmallow pops


There is a lot more space than people so I'm going to set up different areas for the kids to play and I bought this 6ft Sesame St backdrop so everyone can take pictures. Although if I have enough scrapbook paper and/ or patience leftover I might make centerpieces like these
decor

Now somehow, after all this..... I also have to cook :-?

Saturday, February 18, 2012

Camera Love Affair

For Christmas 2009 Tony got me a digital SLR Canon Rebel. I love this camera. I will trade my small pocket camera any day for this baby. It may be bulky but you just can't beat the quality and customization.


Although I live in what some might consider a "ghetto" neighborhood of Brooklyn, I have the luxury of being so close by to sooo many places. Im 20 minutes fromm Manhattan by train, 30 minutes to Coney Island beach & the NY aquarium, 20 minutes walking to the Prospect Park Zoo, and 15 minutes walking to the Brooklyn Botanic Garden, just to name a few. I went to take Kayla to the park yesterday because it was going to be just above 50 degrees, but of course the moment we get there Kayla passed out. The park is immediately next to the Botanic Garden and since its winter its free until March 14 so in I went. And I took so many pictures my camera battery actually died. LOL....  Anyway here are a few of my favorite


Hmmm i love. Mind you I have no idea what Im really doing, I just take pictures of things I think look nice. And its February, Imagine this place in two months!!!


And then I go home and mess with Picasa..... I could spend hours fiddling with my pictures. Here are 2 before and afters


And another one


Whats so bad about Brussels Sprouts.

So, I just finished a mini plate of Brussels sprouts and I really dont see what all the fuss is about. I did a quick and simple recipe I found on Allrecipes.com


Sooo simple.... cut the sprout in half, use a v-cut to remove the stem, then slice it really thin. In a cold pan add about a teaspoon of olive oil, a teaspoon of butter. Turn on to high heat and stir until the butter gets brown. Add the b.s.(ha ha ha ha) stir for about a minute, then add about 1/4 cup of lemon juice. Hit it with some salt and cracked pepper, let it go for about 45 seconds and TA-DA. 


So fast I didnt even take pictures. But I am making this for dinner alongside some leftover meatloaf and baked potatoes to Ill take pictures then. I think Im going to add some crushed garlic to the butter as it browns for an extra layer of flavor. Another recipe Im going to try the roasted version.... parboil for 2 minutes, toss with olive oil and crushed garlic, and bake for 15-20 minutes. 

Thursday, February 16, 2012

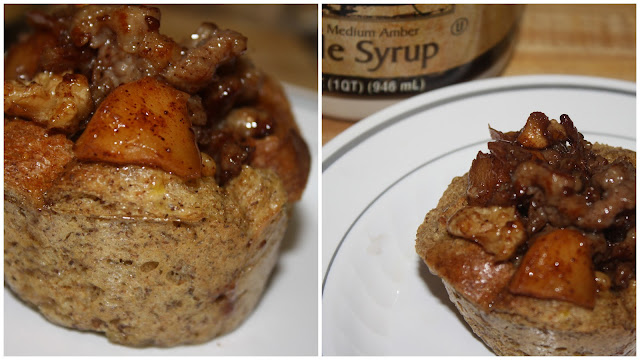
Apples & Sausage French Toast Cups


Ok so I can't resist coming back to my muffin pan. I saw this recipe on another blog called thenoshery.com while I was looking for something else. So of course I have to try this, something new of course. 


FRENCH TOAST CUPS
  • 6 slices of whole wheat bread
  • 3 eggs
  • 1 Tbs brown sugar
  • 1/2 tsp cinnamon
  • pinch nutmeg
APPLES & SAUSAGE
  • 1 cup diced apples
  • 1 cup (8 oz) breakfast sausage
  • 1/4 cup butter
  • 3 Tbs brown sugar
  • 1 tsp cinnamon
  • pinch nutmeg
  • 1/2 tsp vanilla extract
Pre-heat the oven to 400 degrees.


First you make the toast cups. Using a biscuit cutter, about 3 -4 inches, cut out circles from the toast. 


Mix together the eggs, sugar, cinnamon, and nutmeg. Dredge the circles into the egg mixture just like you would french toast. Then simply press them into the muffin pan. Pop the tray into the oven for about 15 minutes.


While that is baking in the oven take in one pan cook up the sausage. In another pan melt the butter, sugar, cinnamon, and nutmeg. Add the apples and cook until soft and the butter and sugar begin to caramelize. After 5 minutes add the sausage to the apple mixture and combine.


Insert noisy kitchen attendant here


At this point take out the french toast cups and let them cool for a few minutes. Spoon the apple sausage mixture into your cup and voila!!! Drizzle with some maple syrup if you like and stuff your face!!!


Wednesday, February 15, 2012

Ohhh la la Pot De Creme

So you know me, cakes and cupcakes and pretty much anything in a muffin pan. But can you believe I tried something different. Okay so it was in a ramekin cause I love already portioned desserts, but hey! its not a muffin  pan.

I saw a video for a non-bake version of Pot De Creme and it intrigued me. When it comes to desserts though I like to do my research. I look at multiple versions of the same recipe, notice the similarities and differences, and look at reviews and recommendations. Then Ill usually write down the top 3 and compare side to side, okay so Im a nerd, shoot me.

Pot De Creme are actually pretty simple, most recipes call for heavy cream, a few ounces of thinly chopped chocolate, sugar, eggs yolks, a sprinkle of salt, and vanilla. Now I've been wanting to make this for a few days and why for the life of me is there NO heavy cream at the grocery store, vegetable stand, the other vegetable stand  block down, or the supermarket 4 blocks away. I wasn't about to go all the way to the supermarket 15 minutes by train just for heavy cream.

So crazy as I am, i bought what they had, half and half. In no way am I recommending that you make it that way, please use heavy cream. I wont go into the hot mess I tried (it involved butter & cream cheese & cornstarch) to try and get the fat content and the consistency of heavy cream. But all's well that ends well.

The ramekins in the water bath.

Sprinkle some confectioners sugar and..... enjoy!!!!

I will be honest... i doubled the chocolate of the original recipe and doubled the sugar to counter the chocolate. But you can divide those two ingredients in half because this is a Pot de Creme.... so as long as the cream is there you can adjust the chocolate and sugar according to your taste.

Pot De Creme Recipe:

  • 6 ounces bittersweet chocolate, cut into small pieces
  • 2 cups heavy cream
  • 1/2 cup milk
  • 6 egg yolks
  • 1/2 cup granulated sugar
  • Pinch salt
Pre heat oven to 375 degrees
In a kettle or a small pan bring a few cups of water to boil.
1. Chop of chocolate and place in a heat proof bowl, set aside. 
2. Mix up the egg yolks in a small bowl and set aside.
3. In a pan over medium heat warm the heavy cream, milk, and sugar. Continually whisk and watch the cream mixture, heavy cream boils over VERY quickly. Remove from heat immediately when it starts to boil.
4. Pour in the cream sugar mixture into the bowl with the chocolate, whisk until chocolate is melted and fully incorporated.
5. Pour a small amount of the chocolate cream into the egg yolks, this is tempering to make sure that the egg yolks dont cook and curdle. Repeat and them pour the egg yolk mixture into the bowl of chocolate cream. 
6. Ladle the mixture into 6 ramekins. Place the ramekins into a baking dish and carefully fill the baking dish with the boiling water until it reaches halfway up the ramekins.
7. Cover with foil and bake for 30-35 minutes @ 375. Let cool and then refrigerate for a few hours or overnight. 

Monday, February 13, 2012

Muffin Pan Obsessed: Cheesy Chicken Tartlets

Ok so I just said this morning how obsessed I am with my muffin pan and making breakfast and dessert with them. Breakast: obviously muffins, pancake muffins, muffin pan frittatas, dessert has been cupcake galore, any recipe I find i manage to make a cupcake version of it. Now Ive added dinner to that list.


I made this Cheesy Chicken Crescent Braid I found on Allrecipes.com.http://allrecipes.com/recipe/chicken-and-broccoli-braid/detail.aspx Soo good. So of course I had to adjust and put it in a muffin pan.

For the filling i subbed the mayo for lite cream cheese (you can also probably sub wit yogurt) and added some smoked gouda i had on hand. For the crescent dough I pinched it together, then cut it into 12 squares. Press them to the bottom of a PAM sprayed muffin pan, bake for 10 minutes, add a heap of the cheesy chicken mixture and bake for another 10 minutes and enjoy!